| INDEX | 1300-1599 | 1600s | 1700s | 1800s | 1900s | CROSS-ERA | ETHNO | |
| MISCELLANY | CONTACT | SEARCH | |
|
|
If you're going to fully interline the coat, or interline part of the fronts, baste the interlining to the top fabric. From now on, treat these two layers as one.
Before you put all the parts together, leaving you with a rather unwieldy amount of fabric, you should make the pockets in the front parts. Their position isn't marked in the pattern: Their upper edge should sit slightly above the end of the side slits and roughly in the middle between front and side. The technique is basically the same as the modern one, with the exception that the pocket slit is not just a slit, but a semicircular cut-out with the straigth edge up. If partial interlining reaches all the way to the pockets, make the pocket throught top fabric and interlining both. This will stabilise the pocket further and keep the interlining in place. The flaps are lined with the same fabric as the rest of the coat. It is a good idea to attach a piece of linen to the indside of the top fabric with invisible running stitches before inserting the pocket. This will stabilise the cut-out.
Baste a 5-6 cm wide strip of linen to the front edge to stabilise the buttons/buttonholes, following not the fabric edge but the seam line. Otherwise you'd later have to fold back both the top fabric and the interlining, making the front edge bulky. The other interlining pieces are more difficult to attach invisibly. Make the stitches tiny on the outside, long on the inside, and use thread in the colour of the top fabric. In wool, you can have the stitches not go all the way through the fabric so that they won't show at all. Having sewn the back parts together and the fronts to the back, attach one strip to the horizontal waist-level cut in back, and a small patch to the top endes of each side slit. Baste strips to the vertical edges of the side slits and of the slightly curved edges of the back insert. These vertical strips will ce caught to the fabric when attaching the lining, so no need to trouble yourself with invisible stitches there. Again, have these strips stop at the chalked seam line.
Now you can close the shoulder seams and attach the back inserts. Take care to attach the straight edges to the back parts. The surved ones form the centre back slit. The angle at the top, where the vertical seam meets the horizontal one, requires exact cutting and sewing and small cuts into the seam allowance to make the fabric lie smoothly. Sew up the sleeves and pin the back sleeve seam to a point 4-6 cm above the seam that connects the front to the back. Baste the sleeve onto the coat, starting at the pin and going around the bottom aof the armhole. Leave the top loose for the moment.
Have the victim put the vcoat on and theck the fit. Can the coat be buttoned across the stomach without strain? Does the back hang smoothly? Pin the tops of the sleeves to the coat. The seam should be not on top of the shoulder, not as far out over the shoulder as it would be in a modern suit (remember that there won't be any shoulder pags to hold the fabric up), but somewhere in the middle. Speking of pads: If no major alterations are necessary, take the opportunity of padding the chest. The padding should fill out the hollow between the shoulder and the chest muscles and also amplifies the latter if they are not too well developed. Pull the wool apart to form a flattish pillow that becomes thinner towards the edges. Place it between the top fabric and the interlining (if you're using the kind recommended for a 1750s suit that goes all the way to the armhole). Pull it into the right shape if necessary, add or take away until the coat to forms a smooth curve from shoulder to chest. The padding must stop short of the buttoning/buttonholes. Carefully pin the padding in place through the top fabric, not going too deep into the padding. This will only just keep it in place while the victim carefully slips out of the coat. Baste the padding to the interlining immediately afterwards, using long and shallow stitches.
Sew the sleeves on. Fold the allowances of the top fabric away and either iron them flat or baste them in place.
Put the lining together the same way as the top fabric. Fold its edges away as well, then start pinning it to the top fabric starting at the back if the neck opening, going around it and down the front edges. If you're not in a hurry, you should now put the coat onto a hanger, with the lining being pinned only to the neckline and the top half of the front edges, and let it hang there for a couple of days, preferably longer. The curved hem edges tend to stretch under their own weight, and different fabrics stretch differently. If you sewed the lining in rightaway, the hem may bag after a while bacause wool stretches more than linen does. In the 1950s and 60s, when grandma had the same problem with (semi)circular petticoats, they often weighed the hems down with densely attached clothespins and hung them in a moist place (the balcony at night, or the bathroom just after showering) to speed up the process¹. The modern method of circumventing the problem, i.e. neatening the top fabric and lining spearately and leaving them unattached to each other, is not period. At the very least, the folds would not hang correctly. Do the beeches and/or the waistcoat in the meantime.
 |
|
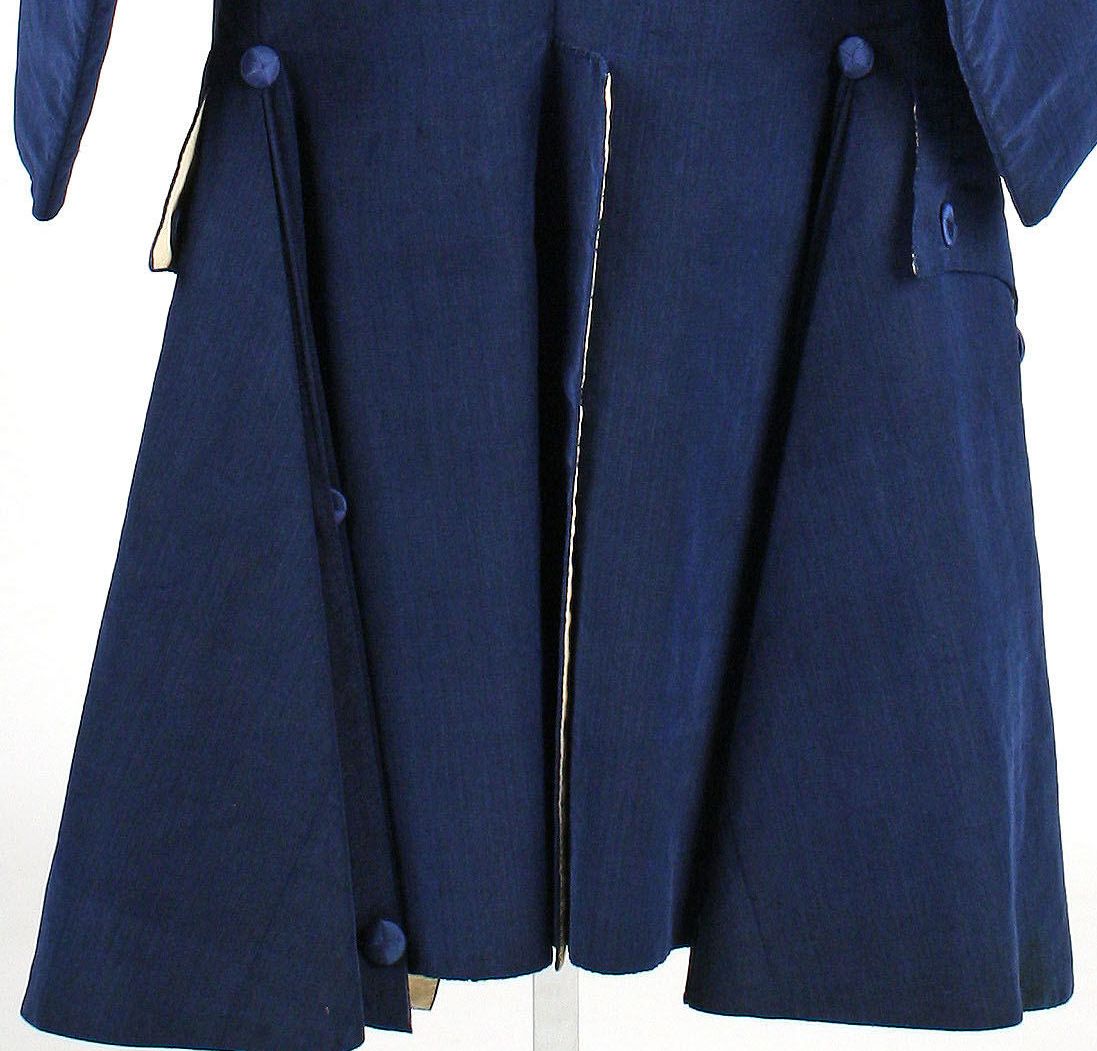
Pic 1: Suit c. 1765 |
When the coat has thus matured, use thread the colour of the top fabric to seam the lining to the edges, only 1-2 mm inside of the edge. The stitches should only just go through to the outside so as to be almost invisible. This will fix the interlining and make sure that the edges stay in place and sharp. Put the coat onto a dummy or wear it yourself while somebody else marks the hemline of both the top fabric and the lining. This is done the same way as with women's skirts: The hem should be the same distance from the floor all around.
Place the coat flat on the ground, inside up, and smooth the lining out. Lightly baste it to the top fabric about 5-6 cm up from the hem. You'll have to do this for each front and back part separately because not all of the coat can lie flat all at once. It's a good idea to mark the fold lines of the side slit pleats while you're at it, and baste the lining to the top fabric along these lines while you're at it. This will make laying the pleats easier and also mark the lines on either side of the fabric.
Fold all vertical edges to the inside and attach the lining to the top fabric. Do the same along the hem line.
 |
|
Pic 2: Suit c. 1720 |
Now the pleats at the side slits are laid. The number and depth of the pleats depends on the pattern you're using. Mine gets one pleat in the front part. The outer fold is an extension of the side seam; the edge lies exactly under the outer fold. So you go once in, once out. The back gets two pleats: In, out, in out. Again, the outer fold extends the side seam straight on, and the edges lies under the outer fold. There is another fold where the back inserts are attached so that the fold lies on the seam where the insert is attached to the back. At the top of the slits, the pleats are caught together though all layers. At the bottom, through the two innermost layers. Usually a button is attached to the top of the slit, often to the bottom, and sometimes also to the middle (pic 1). Early (i.e. pre-1740) suits tend to sport blind buttonholes along both sides of the centre back slit (pic 2).
 |
|
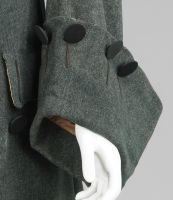
Pic 3: Suit c. 1755-65 |
For the cuffs, treat the interlining and top fabric as one. In my experience, you should use either horsehair or glued linen as interlining. The lining should be the same as for the rest of the coat. Make up top and lining separately, then place them right on right and sew them together along the top edge. Turn and iron the top edge. Smooth the layers out and baste them together about 4-5 cm above the lower edge. Do the same with the sleeve and sleeve lining. Sew the cuff lining to the outside of the sleeve (the shorter, slightly curved cuff seam meets the front sleeve seam), then fold the cuff up, smooth the top fabric around the lower end, turn its edge under and seam it onto the sleeve lining just inside the fold.
The cuff is held up by 4-6 buttons which sit on false buttonholes. Four is the more usual number: One 2 cm inside of the front sleeve seam, one 2 cm outside, and two more on the outer side (pic 3). The buttonhole should start roughly as far below the top edge as the diameter of the buttons, and be a bit longer than the diameter. It's made just like a normal handmade buttonhole (through top, interlining and lining), only that it's not cut open. Therefore it's important to draw the line for the non-slit really straight and sew exactly along it to get a really straight buttonhole.
Make sure that the turned-up cuff lies exactly as it's supposed to lie, pin it in place, and sew the buttons on at the top end of the buttonholes through all layers of the cuff and sleeve. The modern observer may find it strange that the back of the sleeve flaps loose, revealing a differently-coloured lining. Do not let this cofuse you! It's exactly as it should be. Some extant suits even have embroidery on the cuff lining – a sure sign that it was meant to be seen. Therfore, you should consider lining the cuffs e.g. with silk even if the rest of the coat is lined with linen. If you do this, line the pocket flaps with the same silk.
 |
|
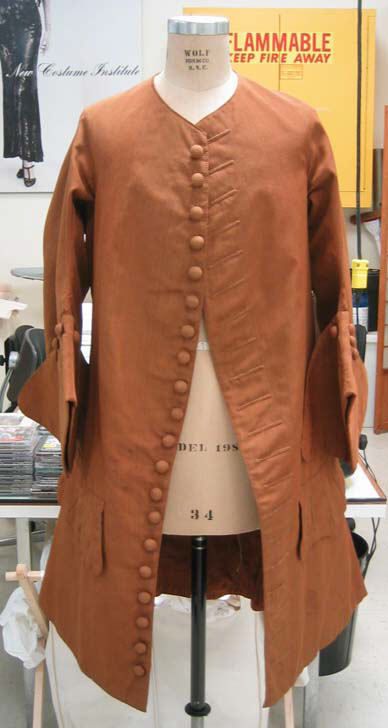
Pic 4: Suit c. 1735 |
Now the buttonholes: Those between the end of the breastbone and the navel should be real, usable buttonholes, even if it was customary to leave the coat open. The rest are false buttonholes. Make them in the left side of the coat. Depending on the pattern and your taste, you can make 10-12 holes from neck to waist, or have them go all the way down to the hem. Same goes for buttons. The uppermost button sits just below the curve where the neck opening merges with the front edge. The interval is a matter of taste. In my experience it looks best if the interval is twice the diameter of the buttons or slightly less. The simplest buttonholes are made with buttonhole silk the colour of the top fabric. If you're good at making even buttonholes, consider using silk of a contrasting colour and extending the stitches beyond the actual holes. Really long, showy buttonholes were popular in the 18th century.
Optionally, place a button at the top of each side slit. Sew a button under the each of the tips in the pocket flap. Until about 1750, the pockets should be buttonable at least in theory, so the buttons are really under the flap, and the flap had(false) vertical buttonholes. Later, the buttons were half under the flap or even just outside it, while the pocket flap either had false buttonholes or none at all.
1) Kunder, Lieselotte. Schneidere selbst. Freiburg i.B.: Herder, 1966
Next chapter: The waistcoat
Wednesday, 15-May-2013 23:53:14 CEST
Content, layout and images of this page
and any sub-page of the domains marquise.de, contouche.de,
lumieres.de, manteau.de and costumebase.org are copyright (c) 1997-2022 by Alexa Bender. All rights
reserved. See Copyright Page.

GDPO


This work is licensed under a Creative Commons License.