| INDEX | 1300-1599 | 1600s | 1700s | 1800s | 1900s | CROSS-ERA | ETHNO | |
| MISCELLANY | CONTACT | SEARCH | |
 Mary, who had already translated the original instructions, has added this multi-size
adaptation for modern use. A round of applause, please!
Mary, who had already translated the original instructions, has added this multi-size
adaptation for modern use. A round of applause, please!
What follows is in her very own words, whereas typos are mine.
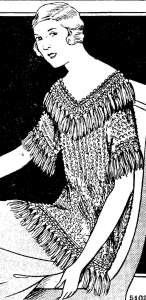
This pattern is unique for its time as it includes a schematic and detailed illustrations for how to work the stitch patterns and how to make the fringe, which are rare! Most knit and crochet patterns of this era took the needle worker's knowledge fro granted and only gave vague, general instructions.
The oroginal pattern is written for a size small only. I have adapted it to include a range of sizes from XS to XXXL to fit modern women. The design and drape of the garment is flattering to women of all sizes.
Obviously, the yarn used for the original pattern is no longer available. I substituted a #3 mercerized cotton crochet thread which is slightly finer than the original, but it creates a light weight fabric with a nice drape. #3 mercerized cotton is readily available, easy to care for and colorfast. You may wish to use e perle cotton crochet thread which hasd a sheen and soft hand similar to silk. It would make a very elegant fabric and garment. There are some slight modifications in the finished measurements of the garment because of the difference in gauge. Nevertheless, I feel that #3 crochet cotton produces a staisfying result.
Level of difficulty: Easy.
|
Actual Bust
|
Finished bust | |
| XS | 28"-30" (71-76 cm) | 34" (86 cm) |
| S | 32"-34" (81-86 cm) | 38" (96.5 cm) |
| M | 36"-38" (91.5-96.5 cm) | 42" (106.5 cm) |
| L | 40"-42" (101.5-106.5 cm) | 46" (117) |
| XL | 44"-46" (111.5-117 cm) | 50" (127 cm) |
| XXL | 48"-50" (122-127 cm) | 54" (137 cm) |
| XXXL | 52"-54" (132-137 cm) | 58" (147 cm) |
 All other garment
measurements are the same for all sizes:
All other garment
measurements are the same for all sizes:
12.5 motifs per 4" (10 cm) / 19 rows per 4" (10 cm). For best results, take time to check gauge.
Garment is worked in one piece from side to side.
Decreases at neckline: When working from neck edge to hem (except for very first double decrease), slip stitch over motifs to be decreased, the continue in pattern.
When working from hem to neck edge, skip the last motif(s) of the row.
Increases at neck edge: When increasing 1 motif, ch3, turn work and make 1 sc in front loops of second chain from hook. sc 3 tog, ch1, finish row in pattern.
To increase 2 motifs at neckline, ch5, turn work, and make 1 sc in front loop of second chain from hook. sc 3 tog, ch 1 and finish row in pattern.
Multiple of 2 stitches. Work in front loop only throughout.
Row 1:
1 sc in 2nd chain from hook, sc 3 tog (insert hook first in same chain as previous
single crochet, then in each of next 2 chains - 4 loops on hook - yoh, draw
yarn through all 4 loops on hook). * ch 1, sc3 tog. Repeat from * to last chain
stitch of row. Do not ch 1 after completing final sc 3 tog, make 1 sc
in same stitch as 3rd leg of final sc 3 tog. ch1. Turn.
Row 2:
1 sc in first stitchm sc 3 tog (insert hook first in same chain as previous
sc, then in top of nect cluster, then in next ch 1 that closes the sc 3 tog
cluster - yoh, draw yarn through all 4 loops on hook). * ch 1, sc 3 tog. Repeat
from * to end of row. Again, do not ch 1 after completing final sc 3
tog, make it 1 sc in same stitch as 3rd leg of final sc 3 tog. ch 1. Turn.
Repeat row 2.
Tip: Place a small safety pin every 10 stitches as you make your initial chain. It will help you keep an accurate count.
Tunic is worked from side to side: Chain 252 stitches. Begin pattern stitch (you should have 124 motifs total with 1sc at the beginning and the end of the row). Work even in pattern for 13 (15,17,19,21,23,25) inches (33/38/43/48.25,53.25,58.5,63.5 cm).
Back and neck shaping: Work in pattern over the first 59 motifs only for 8 inches (20.25 cm). Leave off work.
fFront and front neck shaping: Return to the shoulder area at the point where the back and the back neck shaping began. Skip 8 motifs (1st double decrease for neck line made) and attach thread to top of next cluster. Work in pattern for 4" decreasing 2 motifs every row at neck edge (5x more - 6 double decreases total), and then 1 motif every row at neck edge (13x). 25 motifs total decreased. 34 motifs remain.
Work another 4" (10 cm) increasing 1 motif every row at neck edge (13x), and then increasing 2 motifs every row at neck edge (6x). 25 motifs increased. Finish neckline shaping by chaining 12 and attach to back neck edge. (124 motifs restored). Cut thread and reattach at back hem. Work even in pattern for 13 (15,17,19,21,23,25) inches. End work.
Sleeves: Work 4 rows in pattern over center 62 motifs only (31 motifs remain on each side).
Finishing: Sew underside of sleeves and side seams together. Around hem of the tunic, make 2 rounds of sc.
Fringe for hem and sleeves: Take 5 strands of thread measuring 12" (30.5 cm) each and double them. Place 1 tassel per motif around hem of garment and each sleeve. Use a crochet to thread the tassels through the stitch it is to be anchored to. Draw the hanging strands through the top loop to knot (knot should be on the front of garment). Divide tassel strands evenly and knot again as shown in Figure III.
Serrated edging for neckline: Make 1 round of sc around entire neckline. Next round: Ch 5, skip 2 motifs and make 1 sc in next stitch. Repeat around neckline. End with 1 sc. Next round: Make 5 sc in ch 5 loop, 1 sc in sc of row below. Repeat ending with 1 sc in final sc of row below. Repeat ending with 1 sc in final sc of row below. End work and waeve in ends.
Content, layout and images of this page
and any sub-page of the domains marquise.de, contouche.de,
lumieres.de, manteau.de and costumebase.org are copyright (c) 1997-2022 by Alexa Bender. All rights
reserved. See Copyright Page.

GDPO


This work is licensed under a Creative Commons License.