| INDEX | 1300-1599 | 1600s | 1700s | 1800s | 1900s | CROSS-ERA | ETHNO | |
| MISCELLANY | CONTACT | SEARCH | |
|
|
Part 5: Draping the Robe
Sew the two or - in case of narrower fabric - three back parts together to form one back, then drape the back pleats. If you have a dummy, you may put the lining onto it and do the draping on the dummy. Personally I find it easier to do it on the floor because that way, you don't have to constantly pull against gravity. On a table, you tend to either have too much fabric bunched up on too small a surface, or you have to constantly keep your fabric from sliding off the table. Distributing the available fabric among the pleats so that the end result looks right is probably the most tricky part of the whole robe.
Pin the top of the CB onto the lining, CB on CB, left side of the lining up and right side of the top fabric up. (Hint: Put all pins in vertically.) Start pleating one side only at first. See to it that all pleats are at right angles to the top edge of the fabric. Smooth the fabric outwards for about 5 cm, then pleat it back right up to the CB. Pin there (point a in the sketch). Pleat back outwards again, this time for about 8 cm. Pin. Pleat inwards and pin about 2-3 cm from the CB. Turn back. Now you have arrived at the top pleat (b), so every following pleat must go under the previous ones. However, it is easier to start from the other end and pleat upwards from there.
So pin the armscye of the top fabric to the armscye of the lining. Remember to let the seam allowance stick out over the lining. Smooth the fabric towards the CB for quite a bit, let's say 10-15 cm (e). You may have to temporarily remove one of the previous pins to get that far. Pin. Pleat back outwards for about 3 cm (pin) inwards again for 5 cm (pin at point d) and back outwards, stopping just short of the armscye (c). Pin. Pleat towards the CB, for about 8 cm. Pin. Turn back, stop about 2-3 cm from the fold of the previous pleat. Now you're back at the top pleat.
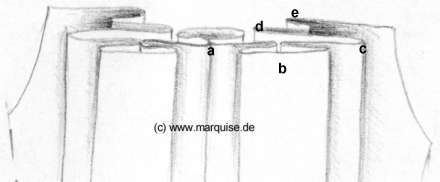
Now let's look at what you've got. Depending on how generous you've been when cutting the back and how wide your back lining is, you now may have too much fabric left, or you may have started cursing before now because you didn't have enough left to make the pleats as deep as instructed. The former is much more probable since I've been conservative about pleat depth, so I'll deal with this problem next. If you're facing the latter problem, remove the pleat at the very back (e) and redo the pleats from there to the top. If that isn't enough, please proceed to chapter 8 (variations), then come back here.
If you have too much fabric, you'll have to make all or some of your pleats deeper. The outer pleats (c, d, and e) should take more fabric than the inner ones. Unpin the outside pleats again and redo from the armscye up. Don't move pleats e and d too much towards the CB; it wouldn't look good. Pleat e can be made quite deep, but its upper fold shouldn't come all the way up to the fold of pleat c, otherwise it would be too conspicuous. If you still have too much fabric, deepen the inner pleats as well.
The end result should be that point a sits right on the CB, the top pleat b is 6-8 cm wide, the pleats below it (a and c) stick out by 2-3 cm under the top pleat - by the same amount on either side - and pleat c goes up to the arm seam maximum. What goes on behind that - how many hidden pleats there are, how much they overlap etc - is nobody's business but yours.
When you're satisfied, pleat the other half of the back the same way. The hidden parts don't have to be perfectly symmetric as long as the result looks symmetric on the surface.
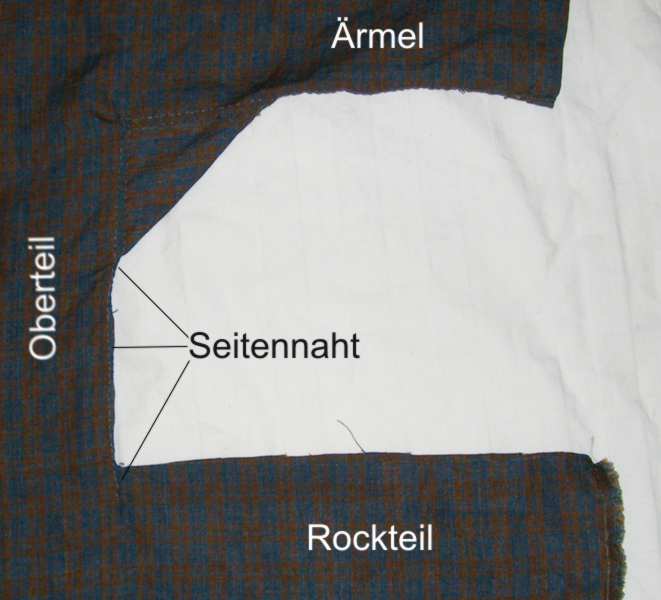
Carefully unpin the top fabric from the lining, making sure that the pleats stay in place. Check again that all pleats are strictly vertical. Baste the pleats together firmly along the top edge. Sew the front parts to the back from armhole to waist, and again along the vertical seams of the skirt part. Since the skirt is to have pocket slits, only baste the top 20-25 cm of the skirt side seam so that it can easily be re-opened later.
Let's turn to the front parts. Fold the turning allowance under from shoulder to just below the waist, then pleat 8-10 cm of the front edge outwards and half of it back again, i.e. the fold of the fabric edge meets the inner fold of the pleat you've just made, or rather, it sticks out by a few mm so that it only just hides the inner fold. The result is the "robing" in the sketch below. Baste it from shoulder to waist.
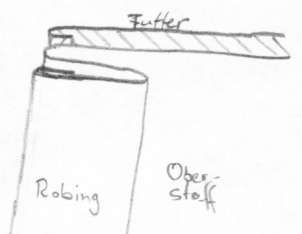
Pin the side seam onto the side seam of the lining and the armscye of the top fabric to the armscye of the lining. Remember that the top fabric must stick out beyond the the lining by the width of the seam allowance since the lining doesn't have an allowance. Lay the whole thing out flat and smooth the top fabric onto the lining from the side seam and armscye to the front. If the top fabric is wider than the lining, make another pleat in the shadow of the robing pleat to take it and pin it in place. Turn the front edge of the lining outwards, facing the robing, and pin its front edge to the front edge of the robing, but a few mm back from it so that it doesn't show. (See sketch above.)
Baste the top fabric to the lining so that it goes from armscye to armsyce in back, as it was when you made the back pleats. Now the top fabric is attached to the lining along the top of the back, along the side seams, and along the front edges.
Now comes the second fitting session for which you need a helper. Put the robe on over the stays. Pin the front edges to the stays as you did when fitting the lining. Have the tapes in back adjusted. If the top fabric doesn't lie smoothly around the torso, have your helper make a breast dart, adjust the pleat under the robing, smooth any excess in back into the pleat hidden under the back pleats... but most importantly, have the shoulder pieces adjusted for length. Starting from where the front is basted to the front lining, they must be smoothed over the shoulder to meet the back. Any excess length must be folded under and pinned to the back so that the fold roughly meets the angle between back lining and front lining and slants downwards from there, as the lining shoulder seam does. The seam between front and back must be behind the shoulder. Have the shoulder line pinned. An illustration showing the shoulder line is on the next page.
Take the garment off carefully and immediately sew the shoulder seam from the outside, using invisible seam stitches. Sew the top fabric to the lining from shoulder to just below the waist, using seam stitches. Lightly baste the back to the lining along a line that runs parallel to the bones of the lining. Don't make this seam too strong. It has to take a lot of stress if you make extreme movements or if someone steps on your train (a deplorably frequent occurrence), but believe me: You'd prefer to have the seam rip and redo it rather than have the seam hold and the fabric rip instead.
If a breast dart was made, sew it from the outside using stitches that are hardly visible from the outside. Mind that if a dart meets the armscye, the armscye becomes smaller so that you will have to attach the sleeve further away from the edge or make the sleeve narrower to make up for it. Sew the hidden pleat under the robings.
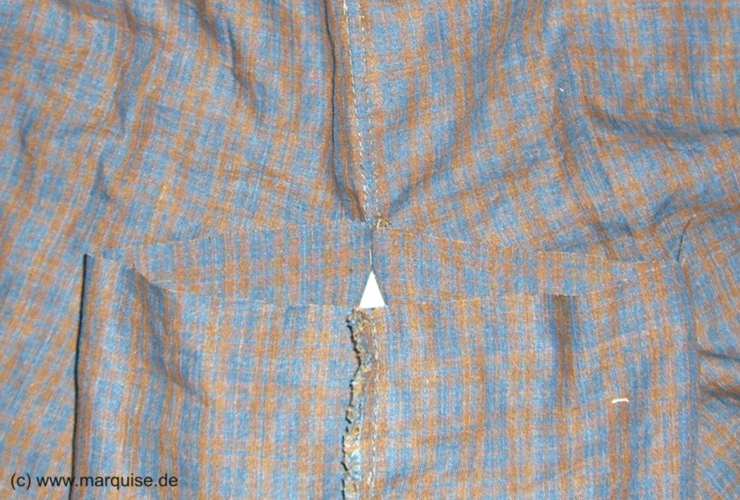
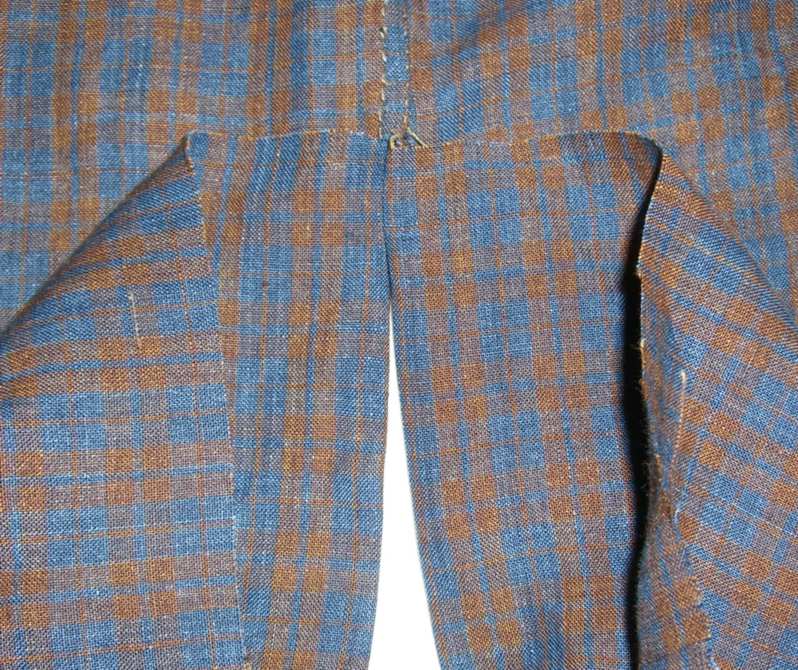
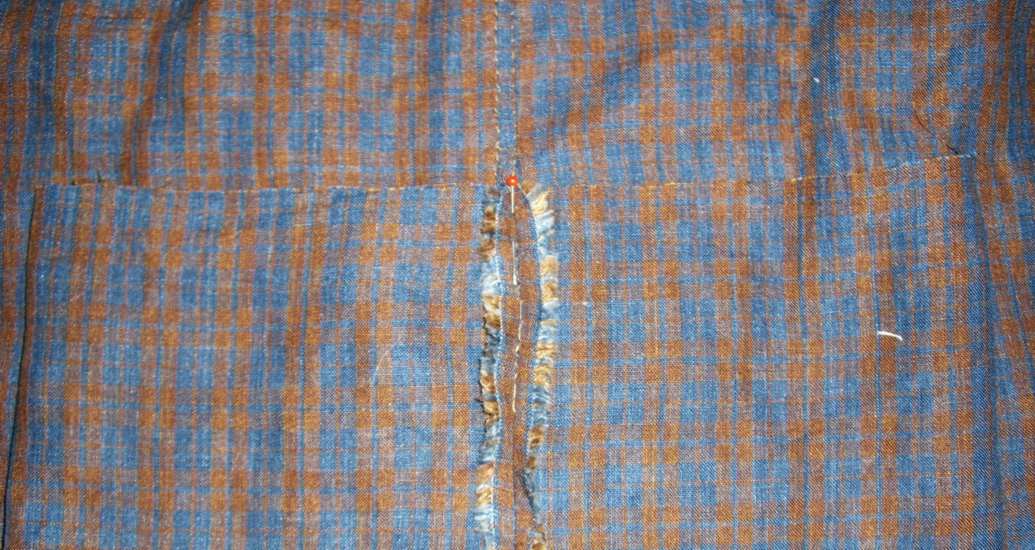
Now is the right time to pleat the upper edge of the skirt part. This procedure has often bewildered visitors although it it's quite simple once you've tried it. I have therefore added photos. Mind you, the pictures show how to pleat the skirt part of a Manteau de Lit (which explains the underarm gusset), simply because I was making one at the time, but the overall method is the same. All pics can be enlarged by clicking.
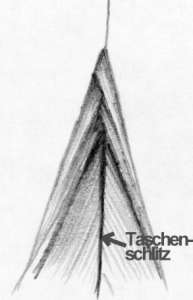
Another method of pleating the skirt part is a bit more elegant, but more difficult to explain: When pleating back towards the bodice side seam, have the folds slightly (0.5-1 cm) go beyond the side seam from either side so that the front and back pleats alternatingly overlap each other a bit, as seen in the sketch to the left. This will hide the pocket slit better, but make it slightly more difficult to access it. This can be remedied by making only the front folds overlap the body side seam, while having the back ones stop at the side seam.
Now you can open the top 20-25 cm of the side skirt seams to form the pocket slits, and either turn the edges narrowly or neaten the edges with self-fabric strips.
Next step: Sleeves and the rest
Content, layout and images of this page
and any sub-page of the domains marquise.de, contouche.de,
lumieres.de, manteau.de and costumebase.org are copyright (c) 1997-2022 by Alexa Bender. All rights
reserved. See Copyright Page.

GDPO


This work is licensed under a Creative Commons License.