| INDEX | 1300-1599 | 1600s | 1700s | 1800s | 1900s | CROSS-ERA | ETHNO | |
| MISCELLANY | CONTACT | SEARCH | |
 The
bedgown, sometimes also called shortgown, is next to the skirt the simplest
female piece of clothing during the 18th century. It's easy to sew and easy
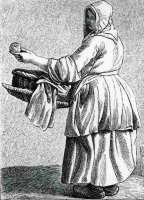
to wear. Made of wool or linen and worn with a likewise skirt, it dresses street
merchants such as the one in the picture on the right. However, the name "bedgown",
and its French name, "Manteau de Lit", both hint to the origin as
a garment that a lady used to wear between getting up and getting properly dressed
- which may have been all morning. Since it is not fitted, it is not absolutely
necessary to war a corset under it, so it is very well suited for wearing to
the breakfast table or for bodily labour. To sum it up, a wealthy lady would
have worn a Manteau der Lit (MdL for short) of silk in the morning, while the
poor sort wore one of linen or wool all day.
The
bedgown, sometimes also called shortgown, is next to the skirt the simplest
female piece of clothing during the 18th century. It's easy to sew and easy
to wear. Made of wool or linen and worn with a likewise skirt, it dresses street
merchants such as the one in the picture on the right. However, the name "bedgown",
and its French name, "Manteau de Lit", both hint to the origin as
a garment that a lady used to wear between getting up and getting properly dressed
- which may have been all morning. Since it is not fitted, it is not absolutely
necessary to war a corset under it, so it is very well suited for wearing to
the breakfast table or for bodily labour. To sum it up, a wealthy lady would
have worn a Manteau der Lit (MdL for short) of silk in the morning, while the
poor sort wore one of linen or wool all day.
The instructions and pattern diagrams on the left side were taken from Garsault's L'art du tailleur, published in the 1760s. They're just translated by yours truly, not edited. The numbering of the paragraphs and the unusual measurement units were left intact; I have even tried to preserve some of its roundabout way of expressing things. I have added the centimetre equivalents in brackets. The column on the right contains my modernised version, based on multiple experiments. To see the full-size pictures of anything,, click the thumbnails.
|
283. The Manteau de Lit. Für a gown of normal size, half an Aune [60 cm] in length. Width depending on the measurement. Length of sleeve from the gusset, one Tiers [40 cm]. Width of sleeve, one Quart [30 cm], widening by one and a half Pouces [4 cm] from the elbow down.
284. The gown is made of one single piece of fabric if it is wide enough, otherwise of two pieces. It consists of two front parts r r, fig. 7, & one back part of the same shape (dotted lines); it is depicted as being of one piece here. Usually it is fashioned en chemise, i.e. with the body and the beginning of the sleeves cut in one. The sleeves are then completed by attaching two pieces. |
The pattern below assumes a breast width (BW) of 90 cm. Actually you
reckon BW + 30 cm if you want a relatively tight fit, or + 30-40 cm if
you want it loose enough to wear without a corset without it being too
conspicuous. Divided by four ((90+30)/4), you get the measurement that
is given in the pattern as 30 cm. I'll refer to this as body width*. Like
Garsault, I assumed a sleeve width of 30 cm when I drew the pattern diagramme,
but it turns out that that's just enough for a stick figure. The sleeves
of my own MdL are 40 cm wide. Just take you own max. upper arm circumference
and add about 5 cm. The 20 cm in the pattern reflect the arm-to-waist
measurement. That is usually OK for someone 160-165 cm Garsault's 60 cm length are barely enough for the shorter women of his time. Decide how long you want it (hip, mid of thigh, almost to the knee), then measure from the top of the shoulder over che chest and down to wherever. If your fabric is 140- 50 cm wide, you'll need twice that length of fabric, usually 150-180 cm. For other fabric widths, please do the calculations yourself. The skirt part should be at least 20 cm wider than the body on either side, i.e. the fabric width (BW+30*)/2)+20. In case of a 120 cm breast width, you'd need (120+30*)/2 + 20 = 95, i.e. you'd have a problem if your fabric was only 90 cm wide. In this case, buy more fabric and cut some extra strips to widen the skirt part. Piecing is good 18th century practice and nothing to be ashamed of! In most cases you'll have to piece the sleeves, too: As it happens, the measurement from wrist to wrist (with arms outstretched) is more or less the same as the one from head to toe, so anyone taller than the fabric is wide will have to add on to the sleeves. The markings in the pattern in German; they mean:
|
|
285. Lay out the fabric & immediately fold it in half across the width; not exactly but so that one side is longer than the other by about three Pouces [8 cm]. Cut the longer side along the centre front until you reach the fold; then cut open the fold for four or five Pouces [11-13 cm] on each side. Next make at an angle into the longer side, without damaging the other, the cut a a. When it has been cut open like this, make the front parts as will be described.
|
If the fabric isn't too thick, you can now fold it once more along the CF line (making it look roughly like Fig. 10 on the left), secure it again with needles, and cut all four layers at once. If the fabric is too thick, make the same markings as above on the other side of the CF line and only cut two layers at once. When cutting, add seam allowances as you feel necessary - more for felled seams in linen or cotton, less for felted wool which doesn't ravel and therefore doesn't have to be neatened. At the top of the skirt part [BC], add 2-4 cm. Save the cut-away fabric. The CF line that you have marked before is cut open and extended beyond the shoulder line by about 8 cm to meet point D. From there, you cout about 10 cm outwards. This horizontal cut will be the back of the neckline, which is why it must be behind the shoulder line. This takes care of Garsault's fuss with not folding the fabric in half at first and then doing so later (285 and 287), which only serves to make sure that the CF cut extends beyond the shoulder line. |
|
286. Make a second fold parallel to the first, so that now the length
of the two sides is equal. Now the parts which you have just cut open
in the longer side will appear as two rectangles a a jutting out
which are three Pouces [8 cm] high and four to five Pouces [11-13
cm] wide. These will become the shoulder parts, & the second fold
which has replaced the first will become the upper edge of the sleeves.
See fig, 10 which shows one of the front parts.
|
Let's forget about the "angle" cut that Garsault mentions under 285. We should first make the back pleat (287 in Garsault): Of the 30 cm we had previously added to the breast width, about 13-14 vanish into it. Fold the back part along the centre back (CB), wrong sides out, and pin the two layers together. Mark a line from the neck to the waist, 6.5-7 cm away from the fold and parallel to it, stopping at waist level. Sew along this line with backstitch. Un-fold the back again, wrong side up, flatten and iron the fold you've just sewn so that the former fold line lies along the seam. The result is an inverted box pleat. Now we know how much of the back neckline remains. Is that enough to accomodate your neck? Probably not, because of the original 20 cm, only 5-6 cm should be left. So cut the neck opening deeper - a bit less deep (because of seam allowances) than your neck is wide. I shall call this the back neck edge. |
|
287. Make a pleat in each of the front parts on the right side of
the fabric a fig. 11, which runs down the edge from top to bottom;
free the neck by making a pleat c within; make a slit beneath the
beginning of the sleeves to insert into it a wedge m; cut the sides
a a fig. 9 according to measurement; leave the rest d fig.
10 for the pleat h h, fig. 8 & 9. If a pleat is not desired,
cut angling outwards toward the seam. |
Since you now know how wide the back neckline [DE] must be, you can cut the "angle". From the end of the horizontal neckline cuts, make another cut at right angles to it back to the shoulder line [EF]. This creates two rectangles that stick up if you fold the fabric along the shoulder line, just as shown in Fig. 7 and 10. I will henceforth call them stubs. Now for the collar. This has had many people stumped, including myself. After some experimentation and cogitation I have concluded that one of the reasons is that Garsault has omitted a pattern part for the collar in the diagrams. He does mention such a part in 289: "Sew [...] the shoulder parts to the ends of the collar". So, cut a rectangle as long as the back neck edge plus double seam allowances on each end, and as wide as the stubs. Now you must decide whether you will fold the collar outwards or inwards. Mind you, the Garsault text does not mention a shawl collar at all, much less which way it is folded. It's just something that happens if you try to follow his instructions. Depending on which way you want to fold the collar, the seam allowances should be on the right or wrong side so that they are hidden. Sew the short ends of the collar part to the ends of the stubs. It should become apparent that you'll have to sew the lower end of the collar to the back neck edge, middle of the collar meeting the back pleat. The "angle cut" naturally becomes an extension of this seam. If you're going to line the MdL, turning the collar (and cuffs) outside is the best choice, simply because it looks good if the lining is nice. |
|
288. Cut the lining & baste it onto the fabric.
|
Close the slit from F via E and E' to F'. Turn the collar to the inside or outside. The MdL does not have to be lined, but it can be. Lining is only necessary if the MdL is made for cold weather, and in that case, I recommend light wool or cotton. Linen would be too heavy and clammy. It looks nice if the lining is made of a contrasting fabric that becomes visible where the collar and cuffs are turned back. Garsault seems to imply that the lining is made up extra, which would allow you to make the MdL so that it can be worn inside out. Make up the lining just as the outside, but wait until the outside is finished, which is not yet the case. |
|
289. Sew the pleats, viz., those running from the waist to the seam; sew the fronts to the back part; the gussets, the undersides of the sleeves, the collar, the shoulder parts to the ends of the collar; sew on the two pieces that complete the sleeves; if the sleeves are en pagode (a fig. 12), those two pieces are longer: The pleats must be made narower on the underside of the arm; this creates the curve seen in fig. 12 which shows the finished gown. |
Make up the sleeves as described for a shift and insert it the same way. Garsault asks for a slit to insert the wedge m into, but it's a lot easier to ignore that and go ahead as you would for a shift. If the sleeves are too short due to too narrow a fabric width, cut pieces off the L-shaped waste you've saved and attach them to the ends (Garsault's 289 "complete the sleeves"). You may, if you like, make Pagoda sleeves, i.e. widening from the elbow down and with a couple of pleats at the elbow bend, just like the ones in Contouche cuffs. Close the vertical seam from waist to hem. Now all that's left is to make the pleats in the top of the skirt part. They are made up just like the skirt pleats of a Robe à la Francaise. I have yet to add the photos to the English version f that; meanwhile, please see the photos in the German version. |
|
290. One concludes by finishing up the seam & attaching ribbons for closure. |
Now neaten the edges (front edge, seam, cuff). If you're using a well-felted woolen, this should not be necessary since it hardly ravels. Depending on how loose the MdL is cut and how you mean to wear it, you may add a pair of ribbons at chest height, pin it closed, or wrap the front edges kimono style, in which case an apron or pinafore is sufficient to keep it closed. Those are, as far as I know, the only closing methods supported by any evidence. |
In addition to the bedgown as described above, Garsault mentions variations as an aside. Some museums have examples of such variations. For instance, instead of cutting a right-angle skirt part that is then pleated, you can cut diagonally outward from the waist down (see Garasault's 287: "If a pleat is not desired, cut angling outwards toward the seam.") For some reason, the slanting skirt usually appears together with another variation, viz., a round round neck opening instead of a shwal collar. One example for this is in "Costume Close Up", some are in the Malmö Museum in Sweden. Incidentally, I know no extant example of a Manteau de Lit as Garsault describes it, i.e. with either a shawl collar or skirt pleats. Since the Malmö examples are, if memory serves, all made of silk, and the one in Costume Close Up of Indian cotton chintz, and knowing that lower-class garments rarely survived, this may mean that upper-class bedgowns were most often made along the slanting-skirt-and-round-neck lines. On the other hand, the angular cut of the Garsault-style bedgown made it a ready source for recycling, which may be the reason why none have survived. (The same is true for the late 17th century manteau.)
There are commercial patterns for bedgowns available from various US providers, all of them based on Garsault's text and engravings. Their creators must have had to guess as much as I have, i.e. when they say "do it this way", it's the result of experimentation and conjecture just as my version is. None of the solutions can proven to be "the correct one", but the instructions that come with the patterns may or may not present better solutions to Garsault's mysteries than the ones above. I only know those patterns from hearsay, but hearsay recommends the ones by Kannink's Korner an J.P. Ryan - see Purveyors.
*) Whenever the body width appears later in the text, it'll be 30 cm marked with an asterisk so you that know where to supply your own measurement.
Source: de Garsault, M. L'art du tailleur.
Neuchâtel 1780 (reprint of the original edition 1769)
The picture right at the top is from "Paris street cries", purloined
from The Costumer's Manifesto
Friday, 23-Jun-2017 11:27:09 CEST
Content, layout and images of this page
and any sub-page of the domains marquise.de, contouche.de,
lumieres.de, manteau.de and costumebase.org are copyright (c) 1997-2022 by Alexa Bender. All rights
reserved. See Copyright Page.

GDPO


This work is licensed under a Creative Commons License.
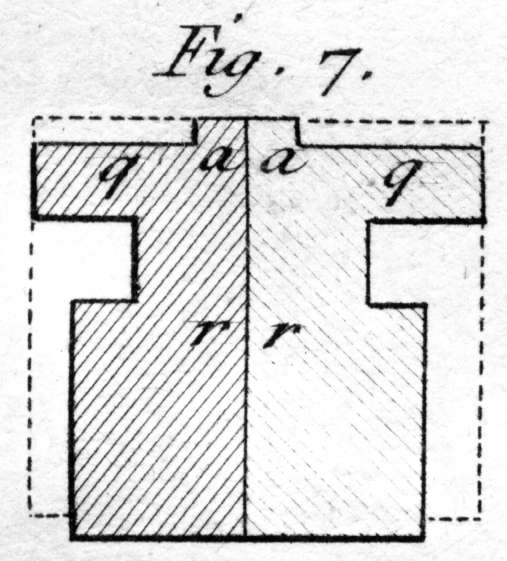

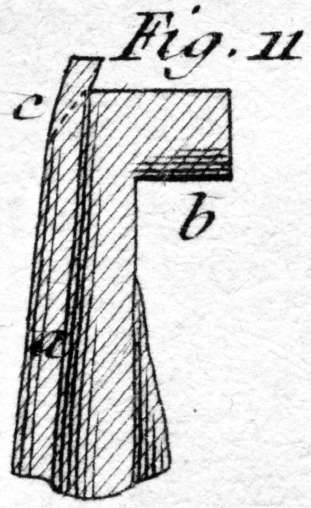
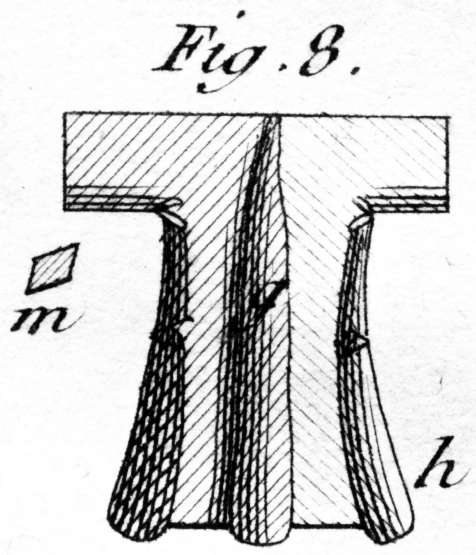
 Fig. 9